Updated 18/03/2021 for Moode 7.1.0 which includes some support for handling Roon Bridge in Moode's UI yet still requires Roon Bridge to be installed manually by the user
Roon Bridge is really simple to install on Moode but out here in forum-land installing things on computers often seems scary for some people, so I though I'd outline the installation and setup process here.
Roon is a proprietary, in-depth music library and lossless music server/playback suite of software which has a ton of great features and is quite brilliant (but relatively expensive). Roon is a client/server model and once you have a Roon Core (the server) setup on your LAN, Roon automatically sees Moode as a playback endpoint if Moode's Airplay renderer is enabled. Airplay isn't ideal though if you like that music to be bit-perfect and in it's native format.
Thankfully Roon has Roon Bridge which can turn any compatible computer into a Roon endpoint and it's available for Linux on ARMv7 computers like the Raspberry Pi.
Let's begin...
Login to a terminal
So to begin login to a terminal on Moode, either over SSH or using Moode's built-in terminal emulator accessible from the system configuration menu.
To access the built-in, web based terminal emulator go to the Moode menu and select Configure > System;
Scroll down and ensure SSH term server is on and select the OPEN button;

Your browser should open a new tab with a prompt to login.
Login as the user pi with the default password moodeaudio.
Download and install Roon Bridge
Assuming your Pi has internet access, download Roon's Easy Installer script with wget.
For Moode 32bit / armv7hf;
... or for Moode 64bit / armv8;
Make the downloaded file executable;
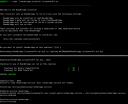
Run the installer and enter y when prompted to continue.;
The installer will then download and install the latest version of Roon Bridge for your Raspberry Pi.

Reboot;
Once Moode has rebooted navigate to the Moode menu and select Configure > Audio, find the RoonBridge Renderer in the Audio Renderers section, switch it on and select the SET button.

That's it! Moode is now a Roon endpoint.
In Roon...
Now go to Settings > Audio in Roon Remote (Android version shown here).
You should now see your Raspberry Pi as a proper endpoint called moode (mine's called hifi in the screenshot) and its available audio devices.
Here you can see the Pi's onboard headphone jack, onboard HDMI output and my Topping D50s DAC.

Enable the desired audio output device and if you want, give it name.

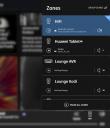
Now you can select your new device in Roon's zones...

... and get bit-perfect output from Roon.

Do note that Roon Bridge will lock the audio device whilst playing so other audio software that comes with Moode like mpd, shairport-sync, librespot etc. will not be able to play whilst Roon is playing to the Pi and vice-versa.
Simply stop whatever is playing from Roon to use the rest and vice-versa.
From Moode release 7.1.0 the Moode UI will blank out when Roon Bridge is active and provides a button to force-stop Roon playback directly from Moode's UI.

Roon Bridge is really simple to install on Moode but out here in forum-land installing things on computers often seems scary for some people, so I though I'd outline the installation and setup process here.
Roon is a proprietary, in-depth music library and lossless music server/playback suite of software which has a ton of great features and is quite brilliant (but relatively expensive). Roon is a client/server model and once you have a Roon Core (the server) setup on your LAN, Roon automatically sees Moode as a playback endpoint if Moode's Airplay renderer is enabled. Airplay isn't ideal though if you like that music to be bit-perfect and in it's native format.
Thankfully Roon has Roon Bridge which can turn any compatible computer into a Roon endpoint and it's available for Linux on ARMv7 computers like the Raspberry Pi.
Let's begin...
Login to a terminal
So to begin login to a terminal on Moode, either over SSH or using Moode's built-in terminal emulator accessible from the system configuration menu.
To access the built-in, web based terminal emulator go to the Moode menu and select Configure > System;
Scroll down and ensure SSH term server is on and select the OPEN button;
Your browser should open a new tab with a prompt to login.
Login as the user pi with the default password moodeaudio.
Download and install Roon Bridge
Assuming your Pi has internet access, download Roon's Easy Installer script with wget.
For Moode 32bit / armv7hf;
Code:
wget http://download.roonlabs.com/builds/roonbridge-installer-linuxarmv7hf.shCode:
wget https://download.roonlabs.net/builds/roonbridge-installer-linuxarmv8.shMake the downloaded file executable;
Code:
chmod +x roonbridge-installer*Run the installer and enter y when prompted to continue.;
Code:
sudo ./roonbridge-installer*Reboot;
Code:
sudo rebootOnce Moode has rebooted navigate to the Moode menu and select Configure > Audio, find the RoonBridge Renderer in the Audio Renderers section, switch it on and select the SET button.
That's it! Moode is now a Roon endpoint.
In Roon...
Now go to Settings > Audio in Roon Remote (Android version shown here).
You should now see your Raspberry Pi as a proper endpoint called moode (mine's called hifi in the screenshot) and its available audio devices.
Here you can see the Pi's onboard headphone jack, onboard HDMI output and my Topping D50s DAC.
Enable the desired audio output device and if you want, give it name.
Now you can select your new device in Roon's zones...
... and get bit-perfect output from Roon.
Do note that Roon Bridge will lock the audio device whilst playing so other audio software that comes with Moode like mpd, shairport-sync, librespot etc. will not be able to play whilst Roon is playing to the Pi and vice-versa.
Simply stop whatever is playing from Roon to use the rest and vice-versa.
From Moode release 7.1.0 the Moode UI will blank out when Roon Bridge is active and provides a button to force-stop Roon playback directly from Moode's UI.


